Stats
- Made by: Joe
- Status: Finished
- Tools used: Thicknesser/planer, table saw, vertical bandsaw, mitre saw, electric planer, belt sander, electric drill.
Description
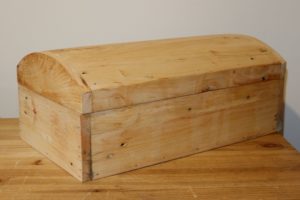
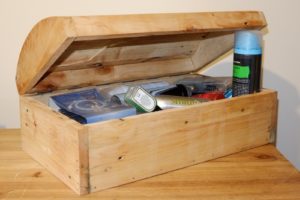
I’ve been keeping my toiletries in a plastic basket that I got at university, despite the fact the basket was way too small and things kept falling through the bottom. After having made a large treasure chest to keep my sheets and blankets in, I decided to take a second attempt at treasure chests and make a smaller, better constructed one from nicer wood.
I started with an interesting looking pallet that I found at work. It was stamped (always check your pallet stamps to make sure it’s safe to use!) as being from Germany, and I believe the wood to be birch or poplar (but I’m no expert). I kept the pallet in my garage for three months to acclimatise it to being indoors and avoid shrinkage.
To prepare the wood I broke the pallet down into planks, and knocked out the nails. Some of the planks split or were discovered to have splits during this process, so I filled the splits with glue and clamped the wood together. Once the glue was dry enough to work with, I ran all the wood through the thickness planer in batches, to expose clean grain on the top and bottom of the wood, and create planks of uniform thickness with parallel faces. I then used the table saw to cut the rough sides down, again in batches to keep the width uniform. After this I used the mitre saw to cut down the ends, and leave me with planks that looked like I’d bought them! (Apart from the nail holes.)
Once I had my wood together, I did a quick sketch on the whiteboard to work out how big my chest could be. I settled on the longest edge being the length of half a plank, which gave me a width of roughly 420mm, a depth of three plank widths (plus two plank thicknesses), or 230mm, and a height for the lower section of 100mm (1.5 plank-widths). This turned out to be perfect, leaving me only a couple of small scraps when finished!
Eager to start actually building the treasure chest, I started on the base. I cut three sections of plank, glued the edges, and clamped them to a workbench with quick release clamps to keep it all square. I screwed some scraps of wood to the planks so that I could remove the clamps and continue working while it was held together. I then cut the front, back and sides, carefully gluing along the plank edges. Using an engineer’s square to keep everything aligned, I tacked the pieces together with some brad nails and a small hammer. I then had a base.
The lid required a curved shape. I got this by bending a piece of wire into the shape I wanted, and taping it to a plank. I then drew the shape onto the plank, and cut another identical plank. These were screwed together, cut along the line with the bandsaw, and smoothed by clamping the pieces in the vice and using the belt sander. I removed the screws, cut a plank in half and connected it to the front and back of each curved side piece, giving me the frame for the lid.
The curved top to the lid was created by first interlocking planks in a Roman arch style. I did this using the table saw’s angle cut function and an electronic angle finder. Each plank I fitted I cut to the correct angle to mate with the next plank, making sure that no part of the plank was below the contour of the curved sides. This worked well until the last plank, which needed a little bit of trial end error to get it to fit in as a “keystone”. Once all the planks were cut, I marked their positions, glued the edges, and tacked them into place from each end. This gave me a very lumpy looking lid with rounded ends. I used the rounded ends as a guide, and cut off all the protruding wood using the hand planer, before smoothing it with the belt sander and finally with sandpaper by hand.
At this point I returned to the base, glue now dried, and sanded down the edges with the belt sander, ensuring the external dimensions matched that of the lid – some back and forth was required as I removed imperfections. Once everything was smooth, I fitted a section of piano hinge with small wood screws, and oiled the wood using cooking oil – this works fine as long as you don’t get the wood wet, and means you can avoid buying oil just for wood!
The chest now sits on my chest of drawers in my bedroom. I’m not entirely happy with it – some of the split, glued planks are obvious, and the glue at the corners has gone grey where I watered it down for better penetration, but as a second attempt (and first at actually contouring the lid properly) I think I did pretty well – there are almost no gaps in the lid, looking almost like a complete, sculpted piece of wood. All in all it took me a couple of hours one evening to process the wood, and another evening to build the chest. I could have done it all in one evening, but I was working on other things at the same time and kept getting distracted! And of course, the cost was virtually free – the only thing I bought was the piano hinge, and I used roughly 1/4 of a £10 hinge.


